Our Rube Goldberg machine was our first project of the year. We were required to build a machine that did a simple task in the most complex way possible, similar to the cartoonist Rube Goldberg's cartoons. For our project we chose the theme of the Disney Pixar Movie "Cars". We decided that our task would be to honk a horn or in our case hit a Staples button.
Over a period of 15 days we planned, built, and finessed our project. It was required that we added 5 simple machines and 4 transfers of energy to incorporate physics . In the video above you can see our end result and how our machine worked. To learn more about our project, please explore my website. You will learn about the physics concepts, reflection of the work we did, construction record, and our before and after blueprints.
Over a period of 15 days we planned, built, and finessed our project. It was required that we added 5 simple machines and 4 transfers of energy to incorporate physics . In the video above you can see our end result and how our machine worked. To learn more about our project, please explore my website. You will learn about the physics concepts, reflection of the work we did, construction record, and our before and after blueprints.
Physics Concepts: There were many physics and engineering concepts that helped my group and I build the project. These concepts helped us understand how our machines functioned and gave us ideas on how we should perfect them and make them work.
We used mechanical advantage in many of our steps. Mechanical advantage is the ratio of the force produced by a machine to the force applied to it, used in assessing the performance of a machine. For example, in our machine we used a pulley. A pulley's mechanical advantage is calculated by the number of pulleys it has working. The mechanical advantage of a pulley makes it that much easier to pull something. In our project, in step two, it took half the amount of force to tip the water cup then it would have due to the fact that our pulley had a 2 times mechanical advantage.
Another concept of physics that we had to learn was potential energy and kinetic energy. Potential energy is the amount of stored energy in an object by virtue of its position to other objects while kinetic energy is an object that possesses by virtue of being in motion. We used this concept in step one with the ramp. The car starts at the top of the ramp and has lots of potential, or stored energy, as it travels down it loses its potential energy and gains kinetic energy because the car is in motion traveling downward. If any object is traveling downwards the object is losing potential energy because there is less room for it to travel before it hits the ground.
Before we started building we also had to learn about simple machines. Simple machines are basic machines that apply force to an object. Throughout our project we use simple machines to move our moving piece from place to place. It was required that we had five simple machines, and we were given the options of using a lever, screw, inclined plane or ramp, wedge, pulley, and a wheel and axle. In our project though we used a ramp (steps 1+7), a pulley (step 2), a screw (step 3), a lever (step 6), and a wedge (step 7). These simple machines applied force to objects throughout our project which contributed to our end goal in honking the horn.
Force is another aspect of physics that was introduced. Force is a strength or energy as an attribute of physical action or movement. There are many examples of force being exerted in our project. This force helps things move through the different machines. The final step is a great example of force. My group and I had to calculate the amount of force it would take to hit the button and make it work but we also could not have to much force because then it would break the button. When we substituted the mass of the weight and the acceleration at which it was falling into the force equation, we found that the weight that we had hit the button with 2.65N of force which ended up working perfectly because it made the button work and it also did not shatter the button.
Acceleration and velocity were also used in our project. Acceleration and velocity helped with our ramps and lever. They told us how fast the car or wheel was rolling in a certain direction and how fast the object was speeding up or slowing down. Acceleration is the increase or decrease in the rate or speed of an object while velocity is the speed of an object in a given direction. In step 7 with the lever, the wheel accelerated down after the lever tilted, this increased the wheels velocity because it increased the speed of the object going in a certain direction. This acceleration helped us calculate the following step too. When we found the acceleration of the first wheel and multiplied it by the wheel's mass we were able to find out the force it would take to start the second wheel that would lead the zip line.
Reflection: The Rube Goldberg machine was a great project that I enjoyed planning and building. I learned a lot about physics and engineering
while also having fun learning to use power tools. I never thought that I would have the opportunity to learn to use power tools in school. I found how easy it was and I now know that I will be able to use them in future projects. I also gained more experience in leading, I gained knowledge on how to help lead a group through many tasks. These positive experiences while working on the Rube Goldberg machine will help me in the future in a group project setting.
Although I learned a lot through my positive experiences, I also learned a lot through my negative experiences. If my group and I had stayed on task more of the time we could have finished earlier and had more time to make sure our project worked 100% of the time. Even though our project worked most of the time it would have been a bonus if it worked every time during our presentation. I know that it is always a good idea to start on an assignment early. Staying on task benefits the group and project. Another thing that I would like to improve on is to make sure to test things out before attaching them to the final project. My group and I spent many days on the zip-line (step 8) which made us lose time. This problem could have been avoided if we figured out that our original blueprint was not going to work and decided to test the step before we put it onto our board. These examples of errors in our project's construction are points that I will try to learn from and not make again.
The Rube Goldberg machine was a fun, interesting, and challenging project that I learned a lot from. It was great to work with people that I had not had the chance to work with before. This was a great first project of the year and I can not wait for more like it.
Here is our construction record which shows the construction that we completed over our nine building days.
Construction Record
Day 1: Planning started with drawing out where all our machines should be placed on our board. We added legs to the back of the board which holds up our project.
Day 2: We built our ramp, screwed in our pulley and added the rope to start our pulley. (Steps 1 and 2)
Day 3: We screwed our funnel into the board and created the two wide pilot holes for our screw to fit into. We attached the two cups to the pulley and finished step two. (Steps 2-4)
Day 4: We cut our plastic pipe and fit it into our board to create the screw. We added a nail on the side of our board to prop up the screw. We nailed the lever to the board and created the table on the left side of the lever for cup of water to sit on. (Steps 4-6)
Day 5: We made the two ledges for the wheels to collide on after leaving the lever and attached the wedge to the second block. We started to make the zip line by attaching the two screws to the board. (Steps 6-8)
Day 6: Attached fishing line to the two screws to finish the zip line and made the ramp with the wheel that pulls the keys on the zip line. (Step 8)
Day 7: We made the ledge for the cup to sit on with the 300 gram weight. We readjusted the zip line and the ramp beneath it. (Steps 8 and 9)
Day 8: We made the ledge for the staples button to sit on. We glued the staples button to the ledge, attached the pictures and painted the number 95 onto our project board. (Step 9 and 10)
Day 9: We added more theme decorations and painted ramps. We tested each step and made sure they worked most of the time. (Step 10)
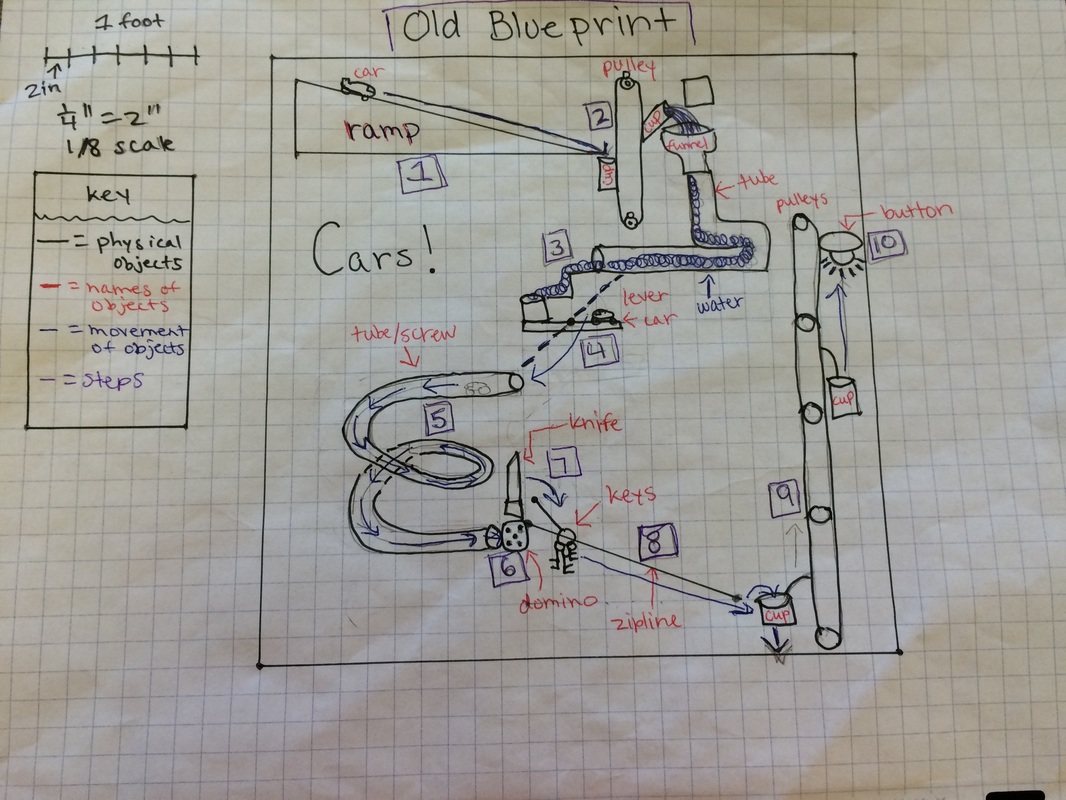
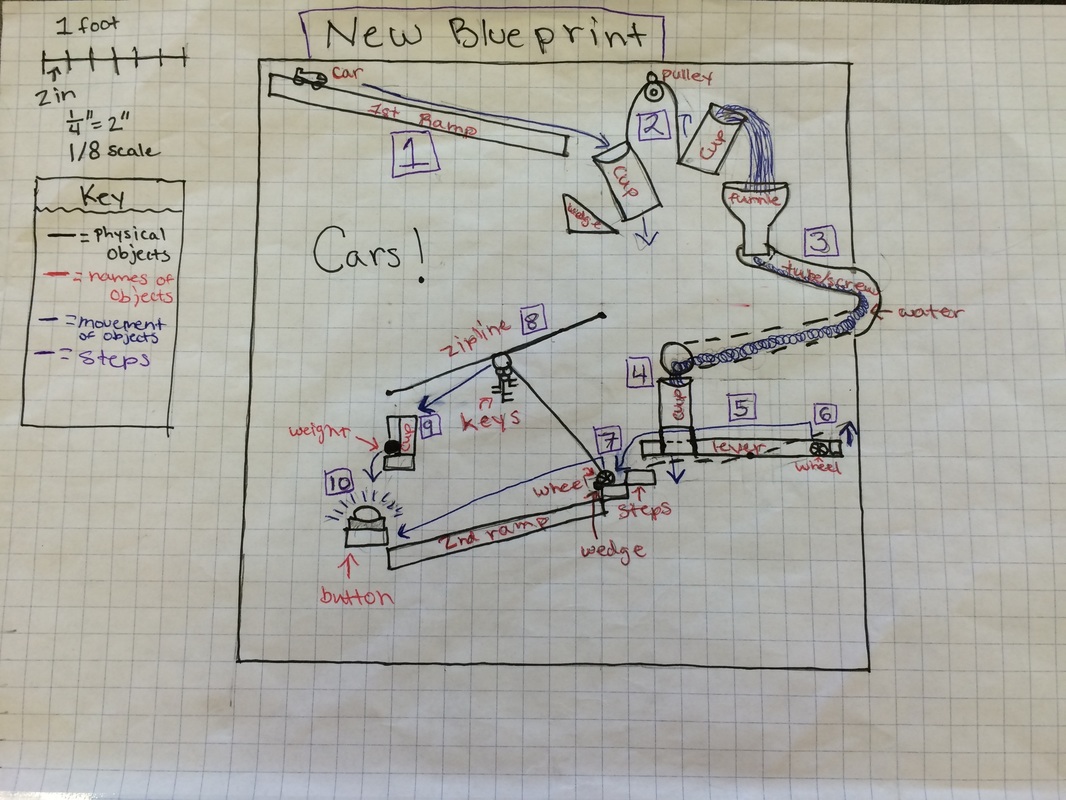
Old and New Blueprints
Here is our old and updated blueprint. Notice the differences and changes we had to make to our project so that it would work.