Evidence Of Work
In this project my group and I did a series of expieriments and labs to better understand how coding and electricity works. My partner and I worked through two packets mainly focused on electricity, learning about the flow of electrons and how to use a breadboard. In our third packet we used a program called Arduino to help us learn how to code. Arduino walked us through many circuits and how to code them in the computer.
When we finished the coding program we were assigned to making a working code and circuit program on our own. My partner and I decided that we should create a circuit that blinks a different color light every every time a different note is played in our song that we created.
Below you can see our finished product working and many other things about our project.
|
|
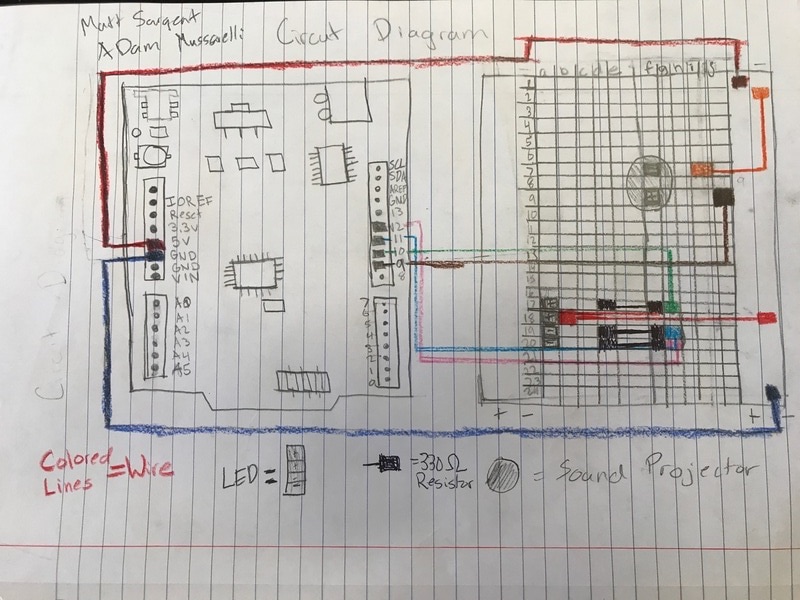
Above is my circuit diagram that shows connection points between wires, resistors, bulb, and sound player.
|
Below is the code that we entered into the computer that told our computer what to make the circuit do. everything on the right of the screen after the // is the explanation of what that line of code does.
Content
Circuit: Loop of conductive material from one battery terminal/power source to the other. We learned about circuits in our first packet when we worked with the big wires and batteries.
Current: Flow of charge/electricity through the circuit. My group and I learned about current when we worked with our first packet. We drew circuit diagrams drawing the flow of current through the circuit in our notes and learned more about current in our breadboard labs.
Voltage: Potential energy difference from one side of a component to the other. Voltage was used in the first packet of labs when we worked with the 9 volt battery.
Resistance: An object that alters the flow of current through a circuit making the current decrease. In our final project we used a 330 Omega resistor to help make our circuit work.
Series: A series is a closed circuit in which the current follows one path. We learned about series in all of our labs because in almost every single lab current flowed through two resistors in a row.
Parallel: A closed circuit that divides the current into two or more paths, each pathway receives the full voltage of the circuit. I learned about parallel circuits in my first lab packet when we did many labs and tested the voltage.
Bread Boards: A board for making an experimental model of an electric circuit. My group and I used breadboards in our final product to house our circuit. You can see our breadboard on the right side of our base in the video above.
Coding: The process of assigning a code to something for the purposes of classification or identification. We used coding to make our final product do what it does. As you can see above our code sends a message to the circuit telling it what to do and when to do it.
Refection
Positives:
- Learned how to code. (I can use coding in my life because more and more jobs are going to be on the computer in the future. It can also be useful in getting into the college of my choice.)
- Learned what a breadboard is and how to use them properly. (During this project I made big strides in my knowledge of electricity and this is just one example. When I started this project I didn't know what a breadboard was, now I can use one and describe how to use it and what it is to others.)
- Broke an ammeter. (I learned the hard way and accidentally broke an ammeter by placing the wires that read the voltage in the wrong place. I will not make this mistake again and this bit of information, even though it was hard to learn, will be useful in the long run.)
- Communication. ( My partner and I were sick for most of the project so some of the time we were doing the project without the other. This not only slowed us down, it also made us do something twice and we had to delete one of them which wasted time. If my partner and I communicated better we wouldn't have had this problem and we could have been more efficient. This mistake will be learned from and in future projects I will find ways to solve this problem.
